Showing posts with label chandelier. Show all posts

Wednesday, September 20, 2017

A Beach-y Master Bedroom!

Thanks so much to many friends who have asked how our Tybee cottages came through when Hurricane Irma blew in recently! I appreciate your concern and am so grateful to report that both Doc Holiday Cottage and The Sassy Seagull are doing great! We feel so blessed that they were not damaged by flood waters or high winds. 

It's been a little while since I shared what we did to make Sassy Seagull live up to her name. Let's get back to it, okay? 

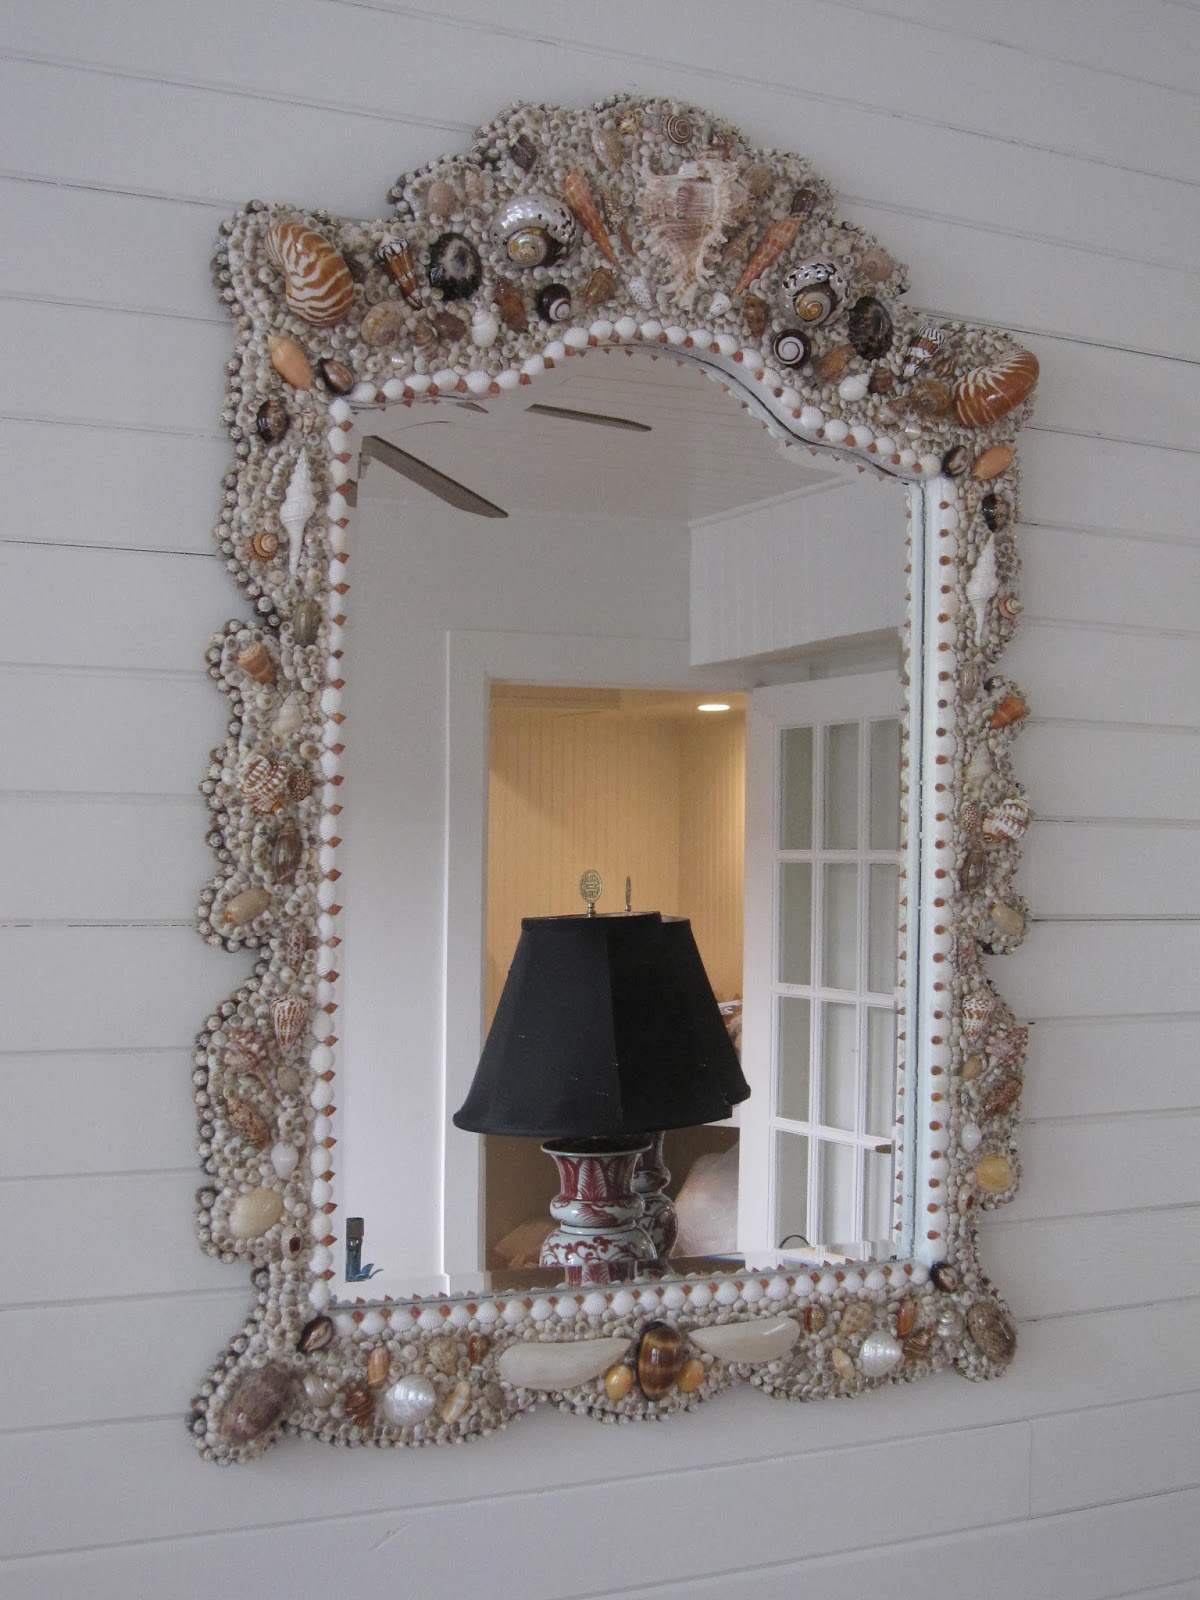
Today--the Front Master Bedroom! Here's a peek taken while standing in the living room...can't wait to show you more! 


This is what the room looked like before renovations began. Not sure why that square of paneling was left unpainted. 


The walls and trim were painted the same color with Martha Stewart's MSL 8002 "Glass of Milk" in a semi-gloss finish. And I decided to have the painted floors sanded, stained and finished with satin polyurethane.


I wanted a medium brown colored stain--not too red and not too black.


And the winner was Minwax Provincial 211...


I selected a chandelier made with oyster shells to give a beach-y vibe to the room. It is available on several websites but I found the best price on Wayfair. It is gorgeous but only has one 60 watt bulb so it needed to be located in a room where we could supplement with  lighting from lamps.


Finally came furniture and accessories....I went with a metal "iron" bed since I needed to place the king size bed in front of windows and didn't want to block the light any more than necessary. I only used a headboard because adding a footboard would take up space visually and make the room appear smaller.


The bedding and lamps came from Home Goods and the striped orange pillows as well as the fish pillow came from Amazon. 


The chair was a family hand-me-down and the nightstands were flea market finds. Michael's was the source for the chair side table. After these photos were taken I purchased a chest of drawers painted in a greenish blue. 


And that's the front master bedroom at The Sassy Seagull!


Monday, July 24, 2017

Ta Da--the Dining Room at Sassy Seagull!

Last week's blog post was about how we turned the "dive" of an old front porch at Sassy Seagull into a dining room. It was so long that I decided to save the "after" photos for another post.

So without further delay, please enjoy....


The table was gifted to us by Meghan (my daughter) and her husband Tom. The aqua metal chairs are from Overstock. Since I saved everywhere else in the room, the capiz shell chandelier was a little bit of a splurge--even with the 30% off sale online at Neiman Marcus--but chandeliers add a lot of bling and I thought it was well worth it. 


Thursday, April 13, 2017

Bright Ideas!

The electricians from Russell Electric have finished their rough-in at the Sassy Seagull! They left a little tongue-in-cheek note on the panel box for the inspector...


And sure enough--as expected, we passed the inspection!

In a few weeks they will come back to put up the light fixtures....sooo I need to get busy and choose light fixtures so they will be here when we're ready to go.

The biggie is the dining room chandelier... It will be prominent and it needs to be something special. I'm willing to spend a bit more for it (if necessary) and cut somewhere else. Here are a few of the candidates...


How do you like this big, beautiful oyster shell chandelier? It would be stunning 
if it is not too big...

Source


I love that big oyster shell chandelier but this is a nice smaller oyster shell chandelier...

Source


Along the lines of using coastal materials, check out this driftwood chandelier...


Source


I am crazy over this boho style chandelier! I have seen it in person and fear it might be too large for my room but isn't it amazing?

Source


Here's another wonderful rustic beaded chandelier that is a good scale for the cottage...

Source: Wayfair


And last but not least is this fabulous capiz shell chandelier--one of my favorites. 
Isn't it fantastic?

Source

I've got to choose soon. Which one(s) do you like the best?


Thursday, January 9, 2014

Gorgeous New Old Stuff!

Where would I be without eBay and Craig's List?  So many of the things I bought for Coast Awhile Cottage  were purchased secondhand from these websites or they came from 
flea markets.

Two reasons for this:   (1)  I can afford better goods if I buy them used  and (2)  the house will have more character, look more collected over time, if some of the things are vintage.

When I looked over the pictures of the dining room to select some to share I realized that almost everything in it was owned by somebody else first.   I wanted a pagoda chandelier for the dining room.  I love the bamboo look--it's beach-y and elegant but not stuffy.  Most of the ones I looked at were out of my price range.  So I began searching for one on  eBay.  It took some time but patience paid off and I found this vintage tole pagoda for an amazing deal!


A coat of spray paint (Rustoleum aqua) and boom--it looks fresh and ready for it's new life at Tybee!


Peter and I couldn't wait to take down the old fan and put it up.

Source:  Jane Coslick

My dining table and chairs were scored by searching Craig's List.  I paid for the table and six nice, heavy chairs with rush seats less than I would have spent for one chair new. The wicker chairs at each end of the table also came from another Craig's List search.


I wanted a buffet or sideboard piece for the white sheetrock wall and this one came from a flea market.  The gorgeous vintage Imari lamps also came from a flea market and I was able to get them for less than I would have spent at a discount store.  They came with wonderful black silk shades but I bought some white ones--it's a beach house after all. 


  I'd have put a pretty painting above the buffet if I had not sold the house.  Maybe one like this one by Bellamy Murphy.  Here's a link with some of her paintings--what a talented lady!

Source


Remember the fabulous shell mirror from this post?  It was a special anniversary gift from my husband Henry.  It wound up coming with us to Doc Holiday when we sold the house but I originally planned it for this dining room.

T


Now let's put these things all together....

The curtains are from Ikea--this style with grommets is called Merete.


 My designer Jane Coslick arranged these shells in an antique bread bowl.  Aren't they fantastic?  It's the little details that make everything magical.
 
Source:  Jane Coslick

 Don't you love the oyster shell candlesticks....Jane's son made them!

Source:  Jane Coslick


Source:  Sandy McCloud


Source:  Sandy McCloud

What do you think?  Pre-loved stuff is not so bad, huh?  Sometimes old things used in a new way can look fresh and beautiful.  Who wouldn't like having dinner in a dining room like this?


Tuesday, October 8, 2013

Doc Holiday Dining Room--Done!

 Once the dining room space  at Doc Holiday was defined, it was time to decide where the dining room table would be placed so we could get the chandelier wiring in the right place to be centered over the table.  I needed to allow a minimum of 36 inches from the table to the wall so that chairs could be pulled out and diners seated comfortably.
 
After lots of measuring and pondering I decided to go with a round table and I started looking for one that could be expanded.  I wanted it to be larger than 48 and smaller than 60 inches in diameter--a size which turned out to be difficult to find.  After several trips to flea markets failed to turn up the right thing, I resigned myself to splurging on a new table.  For something as vital as a dining table that we would use constantly, it seemed like a necessity to make sure we 
had the right one.
 
When looking for something with specific measurements or features, I like to shop online.  It's so much easier to zero in on items that meet your needs and once you've selected something you can easily comparison shop for the best price with a few clicks of your mouse.  That's how I settled on this 54-72 inch Paula Deen dining room table...
 
 
 I like that it is a pedestal table because it will be easier for chairs to go around--no legs in the way!  The color is called "linen".  As much as I love a stained wood color we went with white because it would help the large piece of furniture to blend in with the walls and not take up so much space visually.
 
I saw it offered by several online stores and it even was sold by one of my favorite flash sale websites, Joss and Main.  But I found out that a store in Savannah named Whelan's carried this line of furniture and they were willing to offer me an incredibly good price and free in-home delivery without a wait! Sold!

Next I needed chairs--blue ones preferably.  These were some of the candidates under consideration...
 
 
The one from Pier One (bottom left) was the winner!  I bought six chairs and outdoor cushions to make them more comfortable.


I'm super-happy with the bar that divides the kitchen and dining room.  It was made from wood reclaimed from the renovation of the house.  It has some of the rustic imperfections that make it perfectly imperfect!  I love it!


The bar stools were one of my first purchases.  These well-priced, heavy duty, gorgeous yellow ones spoke to me (really!) when I saw them at Overstock.com...they are now also 
sold by Target.


 One thing I love about the dining room is the lighting above the bar.  When we were planning lighting for the house, designer Jane Coslick suggested we put a couple of these outdoor lights in.  They add such personality as well as light!


 And let me not forget to show you the mirror that my husband Henry painted.  It was found for next-to-nothing at a flea market and now that it is painted with Sherwin Williams Coral Reef paint (SW 6606) it really pops!

I'm still on the hunt for a secondhand buffet/console/sideboard to go beneath the mirror.  It's easy to find good or inexpensive ones but I need one that is good and inexpensive--not easy.  Woe is me--I guess I'll be "forced" to keep shopping until I find just the right thing:)


I had planned to use it in one of the bathrooms but it was too tall sooo...we made adjustments and I think it looks great!  

So this is the dining room!  Do you like it?

The table is shown here with the expansion leaf in.  It can easily seat 6 and possibly 8!
Are you free for dinner?


Friday, October 4, 2013

Chandelier Shangri la!

I showed you lots of chandeliers in my last post...lots of bee-u-ti-ful chandeliers that I loved but had to pass by because they were too costly for me at the end of our major restoration of 
Doc Holiday cottage.  But I was determined to find Chandelier Shangri la in my price range.
So, starting with an inexpensive off-the-shelf chandelier from Home Depot
    
and some spray paint--Rustoleum Painter's Touch Ultra Cover 2X Satin spray paint in Aqua--to be exact this is what my fixture looked like (minus the glass beads).
 It was in great need of some embellishment and some shades for the light bulbs! 
Here's what I did...

First I consulted my friend Beth Silvercloud, a very gifted jewelry artist--you can drool over her creations on her website here.  She had some great ideas and showed me which tool I needed to purchase in order to recycle some of the hooks from the glass bead strands.


 When Beth saw the shell necklaces I had purchased from Michael's she suggested that I use something with larger shells.  She felt (rightly) that the smaller shells were too tiny for the chandelier.  Here they are hanging on the chandelier.  They were kinked from being in the bag and I was trying to get them to straighten out.
In the interest of the budget, I decided to use the smaller shell strands for half of the project--the part where the strands come down from the top of the chandelier to each arm.  Like this...one...two...three...four...five...

...and six!


Then in keeping with Beth's suggestion that I use a larger scale strand of shells I found this rope with shells attached one day while shopping at Home Goods (where else?)!!


 I played with the strand to determine how long each section needed to be to look pleasing as it draped from arm to arm on the light fixture.  Then using some covered aqua-colored wire I found at Michael's, I marked each section


 Then it was time to attach the rope and shell strand to the arms of the chandelier.  I unhooked the other small shell strands temporarily and then reattached them after I attached the rope.

One at a time like this until I made it all the way around...
 Once the rope strands were attached I re-hooked the smaller shell strands.


Almost done!  I had some extra starfish left over and I decided to add them to give a little extra pzazz!  This is what it looked like...


Last but not least--shades.  The bulbs are way too bright without shades.  Voila!

 
Ahhh---It's Chandelier Shangri la!